Conquering the Spiral Abyss 12th Floor: Meta Teams for the Current Patch
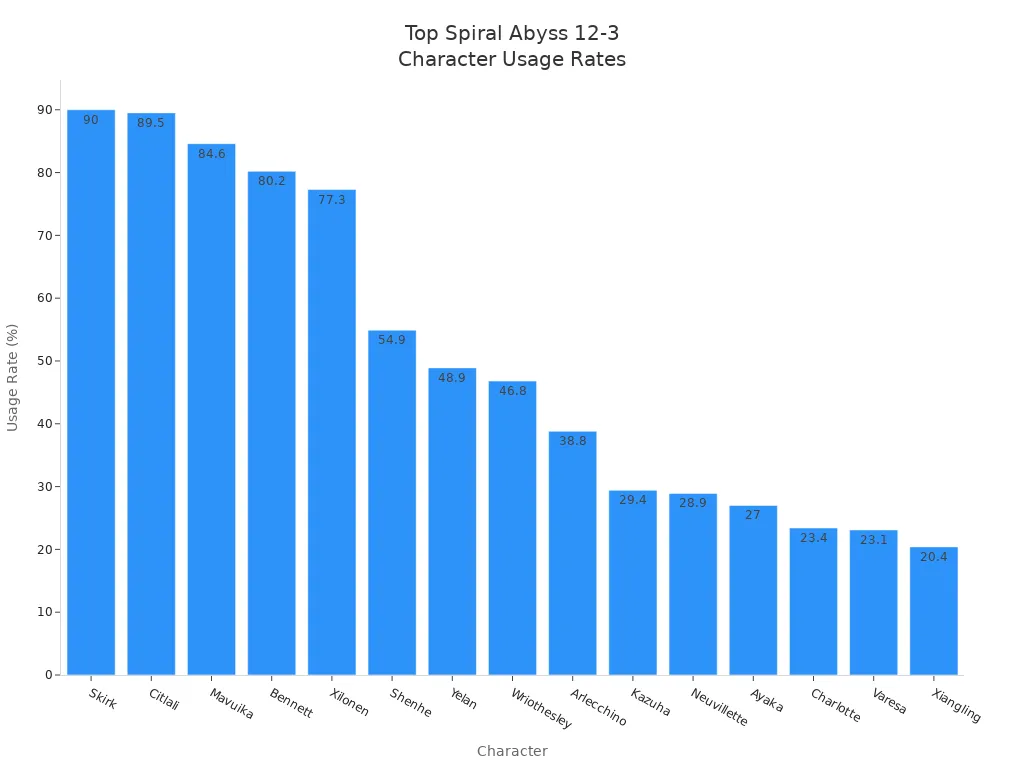
Ready to tackle the Spiral Abyss 12th Floor? You’ll want to build your teams around the most-used characters this patch. Here’s a quick look at the top picks:
|
Ranking |
Character |
Usage Rate |
|---|---|---|
|
1 |
Skirk |
90% |
|
2 |
89.5% |
|
|
3 |
Mavuika |
84.6% |
|
4 |
Bennett |
80.2% |
|
5 |
77.3% |
You’ll notice that each chamber pushes you to adapt. The first half loves Dendro and Bloom reactions, while the second half rewards Electro-Charged and Lunar-Charged teams. Whether you have premium five-stars or rely on F2P options, smart team swaps and reaction setups make this floor beatable for everyone.
Spiral Abyss 12th Floor Overview
Ley Line Disorders & Mechanics
When you step into the Spiral Abyss 12th Floor, you face some of the toughest challenges in the game. Each chamber brings its own twist with unique ley line disorders. These effects can boost certain elements or reactions, so you want to pay attention before picking your team. For example, this patch favors Dendro and Bloom reactions in the first half. You might see your Dendro and Hydro characters doing extra work. In the second half, Electro-Charged and Lunar-Charged teams shine. Fast Cryo application also helps you deal with shields and freeze enemies.
You need to watch out for enemy waves that appear quickly. Some chambers throw in heavy-hitting bosses or mobs with shields. If you bring characters who can break shields fast or trigger strong reactions, you will clear these waves much easier. Try to match your team’s elements to the ley line disorder for the best results.
Tip: Always check the ley line disorder before you start a chamber. Adjust your team if you see a big elemental bonus!
Rewards & Progression Value
Clearing the Spiral Abyss 12th Floor gives you some of the best rewards in Genshin Impact. You can earn Primogems, Mora, and lots of upgrade materials. Here’s a quick look at what you get for reaching different star milestones:
|
Stars |
Abyssal Corridor |
Abyssal Moon Spire |
|---|---|---|
|
3 |
100 |
15,000 |
|
6 |
100 |
20,000 |
|
9 |
100 |
25,000 |
You also pick up these rewards along the way:
-
660,000 Mora
-
2,400 Primogems
-
168 Wanderer's Advice
-
126 Adventurer's Experience
-
108 Mystic Enhancement Ore
-
15 Domain Reliquary: Tier III
If you complete Floors 9-12 with 9 stars each, you can grab 800 Primogems. Even getting 3 or 6 stars on a floor gives you 50 Primogems each, and 9 stars gives you 100 Primogems. These rewards help you pull for new characters, level up your team, and make your account stronger. Every run brings you closer to building your dream team (and maybe grabbing a figure of them from Bahomu!).
Find Your Next Genshin Impact Figure
Meta Teams & Key Characters
Top Meta Teams This Patch
You need strong teams for the Spiral Abyss 12th Floor. This patch has three top teams that are very good. Each team uses powerful reactions and works well together. Here are the most popular meta teams now:
|
Team Name |
Key Characters |
Strengths and Strategies |
|---|---|---|
|
Neuvillette Hypercarry |
Neuvillette, Furina, Kazuha, Xilonen |
Big damage with Charged Attacks, boosted by Furina and Xilonen, and easy to use. |
|
Mavuika Melt |
Mavuika, Citlali, Xilonen, Bennett |
Strong Vaporize and Melt damage with high Burst and good teamwork. |
|
Hyperbloom Archetype |
Alhaitham/Nahida, Yelan, Kuki Shinobu |
Dendro and Hydro work together for lots of reactions and high damage. |
Each team uses different reactions. Neuvillette Hypercarry does Hydro damage and Kazuha helps group enemies. Mavuika Melt uses Pyro and Cryo for big hits. Hyperbloom teams use Dendro and Hydro for steady damage. These teams help you beat hard waves and bosses.
Tip: Match your team’s main reaction to the chamber’s ley line disorder. This gives you more damage and makes fights easier.
Essential Characters & Roles
Some characters are better for the Spiral Abyss 12th Floor. You want heroes who trigger fast reactions, break shields, or boost damage. Here are some top picks and what they do:
-
Neuvillette: He does huge Hydro damage with Charged Attacks. He works well with Furina and Kazuha.
-
Mavuika: She does strong Pyro damage and triggers Melt or Vaporize.
-
Bennett: He heals and gives a big attack buff. He fits in many teams.
-
Nahida: She applies Dendro fast and helps trigger Bloom or Hyperbloom.
-
Kazuha: He groups enemies and boosts elemental damage. His Swirl helps clear mobs.
-
Xingqiu: He gives steady Hydro and helps Freeze or Vaporize teams.
-
Zhongli: He gives a strong shield and lowers enemy resistance.
-
Arlecchino: She applies Pyro fast and helps break shields or trigger reactions.
Fast Cryo is important too. It helps freeze enemies or break shields, especially in the second half. Use Xilonen or Citlali for this job. When you build your team, think about how each member helps with reactions or supports the main damage dealer.

F2P-Friendly Team Options
You don’t need only five-star characters for the Spiral Abyss 12th Floor. Many four-star and free heroes can help you clear chambers. Here are some F2P-friendly teams that work well:
-
National Team: Xiangling, Xingqiu, Bennett, Chongyun. This team uses Pyro and Hydro reactions for high damage and healing.
-
Bloom Team: Collei, Barbara, Dendro Traveler, Kuki Shinobu. This team triggers Bloom and Hyperbloom reactions. It works well with the current ley line disorders.
-
Freeze Team: Kaeya, Barbara, Sucrose, Rosaria. You can freeze enemies and control the field. This helps with tough mobs and bosses.
You can swap in other four-star characters if you have them. Build Elemental Mastery and Energy Recharge for supports. Match your team’s elements to the chamber’s bonus. With good rotations and reactions, you can earn stars and rewards even without top five-stars.
Note: Don’t worry if you don’t have every meta character. Mix and match your best heroes and focus on strong reactions. You can still beat the Spiral Abyss 12th Floor with smart play and good timing.
Team Building Strategies
Premium Team Synergy
A premium team works best when everyone helps each other. You need a strong DPS to do lots of damage. A sub-DPS helps with reactions. A support gives energy to the team. The flex slot lets you add someone for extra help. Here’s how each role helps your team:
|
Character Role |
Contribution to Synergy |
|---|---|
|
DPS |
High damage output |
|
Sub-DPS |
Elemental reactions |
|
Support |
Energy generation |
|
Flex |
Adaptability in roles |
Resonance bonuses make your team stronger. Hydro resonance gives more HP and healing. Dendro resonance makes your reactions hit harder. Pyro resonance boosts attack for hypercarry teams. Electro resonance helps your team get energy faster. You can mix these bonuses to fit what the chamber needs.
Tip: Always bring a healer or shielder. This keeps your team safe so you can attack more.
F2P & Low-Investment Builds
You don’t need five-star characters to beat hard floors. Teams like National Team, Taser Team, and Hyperbloom Team use four-star heroes. These teams can finish chambers in less than three minutes. Smart reactions help them do lots of damage. With good rotations, you can reach most of the meta DPS.
-
National Team: Xiangling, Bennett, Xingqiu, Barbara
-
Taser Team: Sucrose, Fischl, Beidou, Xingqiu
-
Hyperbloom Team: Dendro Traveler, Kuki Shinobu, Xingqiu, Collei
You need about 7 million Mora and 418 Wit to level up each team. Level up your characters first, then get artifacts. These builds help you get close to premium team power.
Flexibility & Adaptation
Enemy types change with every patch. You need to change your team to match new enemies. If there are more Cryo enemies, use Pyro or Reverse Melt teams. For Dendro mobs, Mono Geo teams give strong shields. Always check the chamber before you start.
|
Strategy |
Explanation |
|---|---|
|
Adapt team composition |
Change your lineup for each chamber’s enemies. |
|
Strategic character selection |
Pick heroes who boost your damage for the current fight. |
You can switch characters between runs. Try different combos to see what works best. Being flexible helps you beat the Spiral Abyss 12th Floor and get all the rewards.
Spiral Abyss 12th Floor Chamber Guide
Chamber 1 – Enemy Lineup & Tips
You start Chamber 1 facing some tricky enemies. The first half throws the Hats at you. These enemies create three hats and shuffle them around. You need to watch closely because the real one hides among the fakes. Hydro and Electro attacks work best here. When you hit the right hat with these elements, you can paralyze it and deal extra damage.
|
Chamber |
Enemy Type |
Unique Mechanics |
|---|---|---|
|
1st Half |
Hats |
Creates 3 hats, shuffles them, takes increased damage from Hydro/Electro, and can be paralyzed. |
|
2nd Half |
Half-Tulpa |
Summons Half-Tulpas, can absorb them to enter a Rage State, increasing RES and DMG. |
In the second half, you meet the Half-Tulpa. This enemy summons smaller Half-Tulpas. If you let it absorb them, it enters a Rage State. When this happens, it hits harder and resists more damage. You want to defeat the small Half-Tulpas quickly. If you stop the absorption, you keep the fight under control.
Tips for Chamber 1:
-
Use Hydro or Electro characters for the Hats. Try Neuvillette, Xingqiu, or Kuki Shinobu.
-
Focus on fast AoE attacks to clear the small Half-Tulpas before they get absorbed.
-
Bring a shielder or healer. The Rage State can deal heavy damage if you make a mistake.
Pro tip: Watch the shuffle animation. If you spot the real hat, you can burst it down before it hides again.
Chamber 2 – Enemy Lineup & Tips
Chamber 2 tests your reaction speed and crowd control. You face waves of mobs that spawn quickly. Many of these enemies have shields. Cryo and Pyro attacks help you break shields fast. You need to keep moving and use skills that hit multiple targets.
Common enemies in Chamber 2:
-
Cryo Slimes
-
Pyro Mages
-
Electro Specters
Unique challenge: Some mobs spawn far apart. You want a character like Kazuha or Sucrose to group them together. If you let enemies spread out, you waste time chasing them.
Tips for Chamber 2:
-
Use fast Cryo application to freeze mobs and break shields.
-
Bring a crowd control character. Kazuha, Sucrose, or Anemo Traveler work well.
-
Keep your team healthy. Some enemies explode or deal burst damage when defeated.
Note: If you struggle with shielded enemies, swap in a Pyro or Cryo DPS for this chamber.
Chamber 3 – Enemy Lineup & Tips
Chamber 3 is the final test. You face elite bosses and tough mobs. The enemy lineup changes each patch, but you often see a mix of high-HP bosses and support mobs. Some bosses have phases where they become immune to certain elements. You need to adapt your team and switch tactics fast.
Typical enemies in Chamber 3:
-
Abyss Heralds
-
Fatui Agents
-
Elemental Constructs
Unique challenge: Bosses may shield themselves or heal. You want to break shields quickly and stop healing. Elemental reactions like Melt, Vaporize, and Hyperbloom help you deal big damage.
Tips for Chamber 3:
-
Use strong single-target DPS for bosses. Mavuika, Neuvillette, or Arlecchino shine here.
-
Bring a support who can heal or shield. Zhongli or Bennett keep your team safe.
-
Adapt your team between runs. If you see a boss with a Cryo shield, swap in Pyro attackers.
Callout: Don’t forget to check the ley line disorder before you start. Matching your team’s elements to the bonus can make a huge difference.
You can conquer the Spiral Abyss 12th Floor if you study each chamber and adapt your team. Elemental reactions, especially Cryo, help you break shields and control mobs. Try different team setups and watch your progress improve.
Optimization & Success Tips
Rotations & Cooldown Management
You want your team’s skills to work well together. Good rotations mean your bursts are always ready. Swap characters right after using their skills. This keeps energy coming and stops wasted time. Top players swap fast and grab energy orbs right away. If you use Eula, Rosaria, or Fischl, you get energy quickly. Use Superconduct before your main attack to lower enemy resistance. This makes your damage higher. Keep resonance effects active for better energy use.
Tip: Practice your skill order in the open world first. This helps you react faster when things get tough.
Artifact & Weapon Priorities
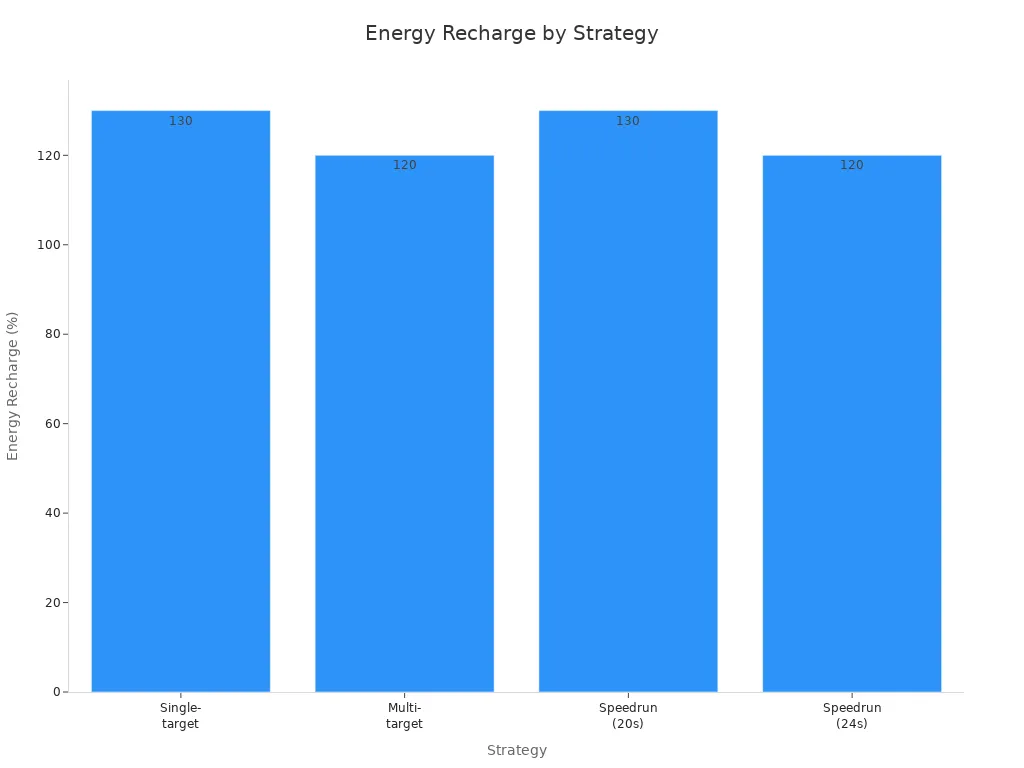
Picking the right artifacts and weapons is important. Use sets that boost your main stat and help with energy recharge. Emblem of Severed Fate is good for burst DPS. Weapons with Energy Recharge or Crit stats help you do more damage. Most teams need about 120% to 130% Energy Recharge. This lets you clear waves in one rotation. Always level up your artifacts and weapons for your team.
-
Pick main stats that fit your character’s job.
-
Upgrade weapons with Energy Recharge or Crit.
-
Balance your team’s stats for damage and survival.
Handling High-Pressure Fights
Tough fights can feel hard, but you can win with a plan. Here are some ways to stay in control:
|
Strategy |
Explanation |
|---|---|
|
Understanding Enemy Lineups |
Know what enemies you will face so you can pick the best team. |
|
Adaptation of Team Compositions |
Change your team roles and elements to fit each chamber’s challenge. |
|
Effective Positioning |
Stand in spots that let you hit more enemies and avoid damage. |
|
Managing Energy |
Use skills that generate energy and keep your bursts ready. |
|
Utilizing Elemental Reactions |
Combine elements for big damage and crowd control. |

Break shields fast to make fights easier. In Chamber 1, use Fischl, Beidou, or Xingqiu for shielded enemies. In Chamber 2, Electro characters like Keqing or Lisa break Cryo shields fast. Zhongli’s shield keeps you safe while you attack. For Chamber 3, use both AoE and single-target damage for bosses and mobs.
Remember: Being flexible and thinking fast helps you beat any challenge on the Spiral Abyss 12th Floor.
You can beat the Spiral Abyss 12th Floor if you stay flexible and learn how each chamber works. Try using both meta teams and F2P teams. Sometimes, Xiangling’s Pyronado or Hyperbloom teams do almost as much damage as the best squads. Look at how different teams do in battle:
|
Team Composition |
Key Characters |
Elemental Reactions |
Damage Output |
|---|---|---|---|
|
F2P Setup |
Xiangling, Xingqiu, Sucrose, Bennett |
Vaporize, Swirl |
40,000+ DPS |
|
Meta Setup |
Mavuika, Neuvillette, Bennett, Citlali |
Various |
Higher DPS |
Keep trying new teams and learn how enemies attack. Build teamwork with your characters. The Bahomu team wishes you luck! You can get every reward if you make smart choices and think fast!
FAQ
What if I don’t have top meta characters?
No worries! You can use strong four-star teams like National or Hyperbloom. Focus on good reactions and smart rotations. Try different combos with your best characters. You can clear Floor 12 with practice and smart play.
How do I deal with shielded enemies?
Use characters who break shields fast. Pyro works well on Cryo shields, and Electro helps with Hydro shields. Bring someone like Xiangling or Fischl. Watch for shield types before you start each chamber.
Can free-to-play teams really clear Floor 12?
Yes! Many players beat Floor 12 with F2P teams. Build your characters, level up artifacts, and practice your rotations. Good reactions and timing matter more than five-star units. You can do it!
What artifacts should I farm for Abyss teams?
Pick sets that boost your main stat. For example:
-
Emblem of Severed Fate for burst DPS
-
Gilded Dreams for Dendro teams
-
Noblesse Oblige for supports
Tip: Upgrade artifacts with Energy Recharge or Crit stats for better results!